
In my previous blog post I introduced Mosby, a Model-View-Presenter library for android. This time I’m going to discuss some more details about MVP in general and Mosby. I have implemented a mail client sample which can be found on Github which is used in this blog entry to describe how to use Mosby and to answer some of the common questions I have been asked after having released Mosby.
While I have written the sample app I have improved Mosby as well. I’m very happy to announce that I have released Mosby 1.1.0. Like you already know (or have suggested) the name Mosby comes from one of my favorite tv shows: How I met your Mother. In this blog post I will give you some tips about MVP and Mosby in Barney Stinson’s legen … wait for it … dary playbook style.
As already mentioned I have written a sample app which mimics a mail client. It’s not a real mail client, it’s not connected to a real POP3 or IMAP Server. All the data is randomly generated on app start. There is no persistent layer like local sqlite database. The APK file can be downloaded from here. If you like me are to lazy to install the APK file on your phone then this video is for you:
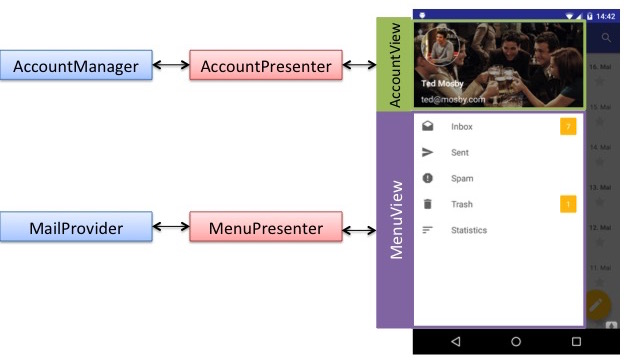
Of course the whole app is based on Mosby and as you see in the video above everything keeps it’s state during orientation changes. Regarding the data structure: A Mail is linked to a Person as sender and another Person as receiver. Every mail is associated to exactly one Label. A Label is just something like a “folder”. A mail can be assigned to one Label. One Label has arbitrary many mails assigned. A Label is basically just a String. In this sample app there are four labels: “Inbox”, “Sent”, “Spam” and “Trash”. So deleting a mail form inbox is just reassigning the label of the mail from “Inbox” to “Trash”. MailProvider is the central business logic element where we can query list of mails and so on. Furthermore, an AccountManager exists who is responsible to authenticate a user. As you see in the video on first app start you have to sign in to see the mails. Internally for the business logic (MailProvider and AccountManager) I use RxJava. If you are not familiar with RxJava, don’t worry. All you have to know is, that RxJava offers an Observable to do some kind of query and as callback the methods onData(), onCompleted() or onError() gets called. If you are familiar with RxJava, please DON’T look at the code! It’s pretty ugly as I changed mind several times during development and didn’t refactored everything as I would do for a real app. Please note that this sample app is about Mosby and not how to write a clean business logic with RxJava. Note also that even if I have used Dagger2 for dependency injection this is not a reference app for Dagger2 nor for material design. For sure there is room for improvements and I would gladly accept pull requests for this sample app.
As you see in the video I’m simulating network traffic by adding a delay of two seconds to every request (like loading a list of mails). I also simulate network problems: Every fifth request will fail (that’s why you see the error view quite often in the video). Furthermore, I simulate authentication problems: After 15 requests the user has to sign in again (a login button will be dipslayed).
The first Tips in this blog post are related on software architecture and MVP in general while the last ones are about Mosby.
Tip 1: Don’t “over-architect”
Take your time to make the right decision. A clean software architecture is necessary. However, at some point you have to start coding. Planning is important but in a real world project you always have to refactor code, even after many hours of analyzing every aspect of your app. In fact refactoring is a vital part of development, you simply can’t avoid it (but you can try to minimize the number of refactoring). Don’t fall into the Analysis Paralysis anti pattern. We java developer also tend to run into a similar “problem”: Don’t over-generalize everything. From my personal experience I think that comparing with iOS developer we android developer tend to write more clean but also over generalized code and that’s one reason why developing an android app usually takes longer then developing the same app for iOS. Don’t get me wrong I really appreciate clean code and design patterns. I can give you a concrete example from my experience: In one of our apps we use a kind of ImageProxy. The idea is simple: Given an url to a image we know that our server provides different versions of this image. Depending on the device, ImageView size, internet connection and speed the correct version for this image should be loaded. So basically we just “rewrite” the url from _http://www.example.com/foo.jpg_ to _http://www.example.com/foo.jpg?quality=high&width=400_. Sounds simple, doesn’t it? So I have started to implement this ImageProxy library. Internally I use Picasso for loading and caching images. However, I decided to keep it very abstract and to make components of the library modular and changeable, i.e you could replace Picasso with any other http image loading library like Glide. I also implemented the Strategy Pattern for dynamically picking the right version of the image to load and to make it more extensible. The idea was that you can add more strategy implementations preconfigured or configureable dynamically at runtime. Guess what, we have never changed the internal core for image loading (Picasso) nor have we added more strategies since we have added the ImageProxy to our app about 3 years ago (app still gets regularly major updates every month). It took me 2 days to implement this ImageProxy library, I have written 10 classes/interfaces. My coworker implementing the same thing for iOS spend about 6 hours and has written 3 classes which mainly contains some if-else statements. You may ask yourself how this tip is related to Mosby. Take it as a general advice. Start with doing the simple thing and afterwards refactor and make it more extensible as app and requirements grow. The same is valid while using Mosby. Try to keep your Presenters simple. Don’t think about too long “how could the presenter be extended if we add feature XY in one year?”.
Tip 2: Use inheritance wisely
To say it from the very beginning: I’m not the biggest fan of inheritance. Why? Inheritance is good to add properties and functionality. Unfortunately I see many developers using it wrong. For instance you are working in a team on a certain app. You have written a MVP View that implements pull-to-refresh on a ListView. This is the base MVP View you use or extend from in almost every screen in your app. It’s super handy, all you have to do to implement a new screen is to subclass from that base class and to kick in a custom adapter and you are ready to go. One day one of your teammates has to implement a ListView without pull-to-refresh. So instead of writing a completely new class many developers make the wrong decision and extend from your pull-to-refresh ListView and try to find a hacky workaround to “remove” the pull-to-refresh feature. This may lead to unmaintainable code, you may see methods overridden with empty implementation and last but not least you introduce some kind of tight coupling from pull-to-refresh ListView to the new class since you can’t change the base pull-to-refresh ListView implementation without having to fear that you break the non pull-to-refresh ListView class. A better solution would be to refactor the original pull-to-refresh ListView class and pull out a ListView class without pull-to-refresh and make the pull-to-refresh ListView class extend from the non pull-to-refresh ListView class. However, if you decide to going this way you may end up having a large inheritance hierarchy, because every subclass adds a little feature like B extends A (adds feature X), C extends B (adds feature Y), D extends C (adds feature Z) and so on. You see pretty the same in the sample mail app:
- AuthFragment: an LCE (Loading-Content-Error) Fragment with an additional state to display a “not authenticated - sign in” button.
- AuthRefreshFragment: An extension of AuthFragment that uses SwipeRefreshLayout as main content view. So one could say: “It’s a AuthFragment with pull-to-refresh support”.
- AuthRefreshRecyclerFragment: Puts a RecyclerView into the SwipeRefreshLayout.
- BaseMailsFragment: An abstract class to displays a list of mails (List) by using the RecyclerView
- There are some concrete classes that extend from BaseMailsFragment like MailsFragment, SearchFragment and ProfileMailsFragment
The inheritance hierarchy might be correct, but do you really think that someone who recently joined your team would pick the right base class to implement a new feature XY? In java it’s all about interfaces and so it should be on android. I, personally, prefer interfaces and delegation over inheritance.
Tip 3: Don’t see MVP as an MVC variant
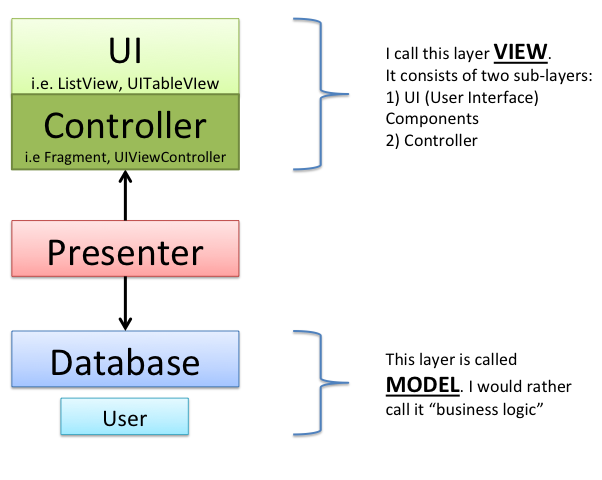
Some people find it hard to understand what the Presenter exactly is if you try to explain that MVP is a variant or enhancement of MVC (Model-View-Controller). Especially iOS developer having a hard time to understand the difference of Controller and Presenter because they “grew up” with the fixed idea and definition of an iOS alike UIViewController. From my point of view MVP is not a variant or enhancement of MVC because that would mean that the Controller gets replaced by the Presenter. In my opinion MVP wraps around MVC. Take a look at your MVC powered app. Typically you have your View and a Controller (i.e. a Fragment on Android or UIViewController on iOS) which handles click events, binds data and observers ListView (or implements a UITableViewDelegate for UITableView on iOS) and so on. If you have this picture in mind now take a step back and try to imagine that the controller is part of the view and not connected directly to your model (business logic). The presenter sits in the middle between controller and model like this:
I want to explain that with an example I already used in my previous blog post. In this example you want to display a list of users queried from a database. The action starts when the user clicks on the “load button”. While querying the database (async) a ProgressBar is displayed and a ListView with the queried items afterwards. The workflow looks like this:
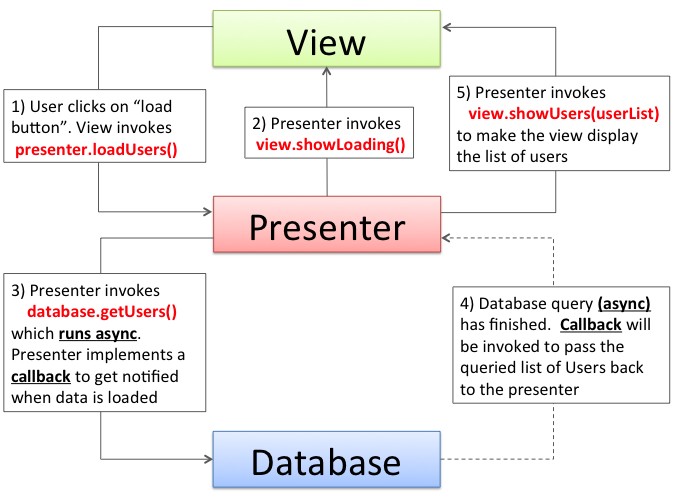
In my opinion the Presenter does not replace the Controller. Rather the Presenter “coordinates” the View which the Controller is part of. The Controller is the component that handles the click events and calls the corresponding Presenter methods. The Controller is the responsible component to control animations like hiding ProgressBar and displaying ListView instead. The Controller is listening for scroll events on the ListView i.e. to do some parallax item animations or scroll the toolbar in and out while scrolling the ListView. So all that UI related stuff still gets controlled by a Controller and not by a Presenter (i.e. Presenter should not be a OnClickListener). The presenter is responsible to coordinate the overall state of the view layer (composed of UI widgets and Controller). So it’s the job of the presenter to tell the view layer that the loading animation should be displayed now or that the ListView should be displayed now because the data is ready to be displayed. A good example can be seen in the workflow image above: After the user has clicked on the “load user button” (step 1) the view doesn’t show the loading animation (ProgressBar) directly. It’s the presenter (step 2) who explicitly tells the view to show the loading animation.
By the way: Yes, I think that MVP suits quite well on iOS too!
Tip 4: Take separation of Model, View and Presenter serious
That might be obvious but to achieve a clean, modular, reusable and maintainable codebase you should really look over your code and ask yourself what that line of code is doing. Is that line of code related to View (UI component or UI controller like OnClickListener) or doing presenters job (coordinating the views state) or business logic (i.e. loading data). The following (pseudo) code snipped shows a BLOB Fragment (all things in one huge class) that displays a form to sign in (similar to the mail sample login):
 public class LoginFragment extends Fragment {

   @InjectView(R.id.username) EditText username;
   @InjectView(R.id.password) EditText password;
   @InjectView(R.id.loginButton) ActionProcessButton loginButton;
   @InjectView(R.id.errorView) TextView errorView;
   @InjectView(R.id.loginForm) ViewGroup loginForm;

   AsyncTask loginTask;
   AccountManager accountManager;

   public void onCreateView(LayoutInflater inflater, ViewGroup root, Bundle b){
     return inflater.inflate(R.layout.fragment_login, root, false);
   }

   @OnClick(R.id.loginButton) public void onLoginClicked() {


     // Controll UI components --> Controllers job
     errorView.setVisibility(View.GONE);
     loginForm.clearAnimation();

     doLogin();
   }

   private void doLogin(){

     // Coordinates the state of the view --> Presenters job
     showLoading();


     loginTask = new AsyncTask(){

       // returns true if login successful, otherwise false
       protected boolean doInBackground(){

         // Interacts with Business logic --> Presenters job
         User user = accountManager.login(username, password);
         return user != null;
       }

       protected void onPostExecute(Boolean successful) {

         // Coordinates the state of the view --> Presenters job
          if (successful){
            loginSuccessful();
          } else {
            showError();
          }
        }
      }.execute();

    }

    private void showError(){

     // Manipulate the UI --> Controllers job
     loginForm.clearAnimation();
     Animation shake = AnimationUtils.loadAnimation(getActivity(), R.anim.shake);
     loginForm.startAnimation(shake);
     loginButton.showLoading(false);

     errorView.setVisibility(View.VISIBLE);
    }

    @Override public void showLoading() {

    errorView.setVisibility(View.GONE);
    loginButton.showLoading(true);
  }


  @Override public void loginSuccessful() {
    getActivity().finish();
  }

 }
I already have added comments with pointing out responsibilities in MVP. Lets refactor that single huge class and apply the Model-View-Presenter pattern. The Model is the AccountManager. The view should have no knowledge of the Model, so pull that out. Everything that coordinates the Views state should be moved into a Presenter. So AsyncTask is moved to the Presenter. The Presenter must be able to coordinate the view. Therefore we introduce an interface for the view LoginView where we define the methods showError(), loginSuccessful() and showLoading(). By defining an interface we keep the Presenter as platform independent as possible (Presenter has no Android SDK related code). Furthermore it makes writing unit test more easy (read more about that in my previous blog post). As we have discussed in the previous tip the Fragment is a Controller and therefore part of the View. So the fragment at the end should only contain code controlling UI components. The refactored code (with Mosby View State support) looks like this:
 public class LoginFragment extends MvpViewStateFragment<LoginView, LoginPresenter>
    implements LoginView {

  @InjectView(R.id.username) EditText username;
  @InjectView(R.id.password) EditText password;
  @InjectView(R.id.loginButton) ActionProcessButton loginButton;
  @InjectView(R.id.errorView) TextView errorView;
  @InjectView(R.id.loginForm) ViewGroup loginForm;

  @Override public void onCreate(Bundle savedInstanceState) {
    super.onCreate(savedInstanceState);
    setRetainInstance(true);
  }

  @Override protected int getLayoutRes() {
    return R.layout.fragment_login;
  }

  @Override public void onViewCreated(View view, @Nullable Bundle savedInstanceState) {
    super.onViewCreated(view, savedInstanceState);

    int startDelay = getResources().getInteger(android.R.integer.config_mediumAnimTime) + 100;
    LayoutTransition transition = new LayoutTransition();
    transition.enableTransitionType(LayoutTransition.CHANGING);
    transition.setStartDelay(LayoutTransition.APPEARING, startDelay);
    transition.setStartDelay(LayoutTransition.CHANGE_APPEARING, startDelay);
    loginForm.setLayoutTransition(transition);
  }

  @Override public ViewState createViewState() {
    return new LoginViewState();
  }

  @Override public LoginPresenter createPresenter() {
    return new LoginPresenter();
  }

  @OnClick(R.id.loginButton) public void onLoginClicked() {

    // Check for empty fields
    String uname = username.getText().toString();
    String pass = password.getText().toString();

    loginForm.clearAnimation();

    // Start login
    presenter.doLogin(new AuthCredentials(uname, pass));
  }

  @Override public void onNewViewStateInstance() {
    showLoginForm();
  }

  @Override public void showLoginForm() {

    LoginViewState vs = (LoginViewState) viewState;
    vs.setShowLoginForm();

    errorView.setVisibility(View.GONE);
    setFormEnabled(true);
    loginButton.setLoading(false);
  }

  @Override public void showError() {

    LoginViewState vs = (LoginViewState) viewState;
    vs.setShowError();

    loginButton.setLoading(false);

    if (!isRestoringViewState()) {
      // Enable animations only if not restoring view state
      loginForm.clearAnimation();
      Animation shake = AnimationUtils.loadAnimation(getActivity(), R.anim.shake);
      loginForm.startAnimation(shake);
    }

    errorView.setVisibility(View.VISIBLE);
  }

  @Override public void showLoading() {

    LoginViewState vs = (LoginViewState) viewState;
    vs.setShowLoading();
    errorView.setVisibility(View.GONE);
    setFormEnabled(false);

    loginButton.setLoading(true);
  }

  private void setFormEnabled(boolean enabled) {
    username.setEnabled(enabled);
    password.setEnabled(enabled);
    loginButton.setEnabled(enabled);
  }

  @Override public void loginSuccessful() {
    getActivity().finish();
  }

}
As you can see LoginFragment now contains only code related to UI components.
The presenter looks like this (using RxJava instead of AsyncTask):
public class LoginPresenter extends MvpBasePresenter<LoginView> {

  private AccountManager accountManager;
  private Subscriber<Account> subscriber;

  @Inject public LoginPresenter(AccountManager accountManager) {
    this.accountManager = accountManager;
  }

  public void doLogin(AuthCredentials credentials) {

    if (isViewAttached()) {
      getView().showLoading();
    }

    // Kind of "callback"
    subscriber = new Subscriber<Account>() {
      @Override public void onCompleted() {
        if(isViewAttached()){
          getView().loginSuccessful();
        }
      }

      @Override public void onError(Throwable e) {
        if (isViewAttached()){
          getView().showError();
        }
      }

      @Override public void onNext(Account account) {
      }
    };

    // do the login
    accountManager.doLogin(credentials).subscribe(subscriber);
  }

}
So instead of having one huge Fragment with over 300 lines of code now we have two classes with about 100 lines of code each. Moreover, now we have reusable, maintainable code and a clear separation of responsibilities.
Tip 5: Presentation Model
In a perfect world we would get the data (Model) exactly the way optimized for displaying it in our GUI (View). Quite often you retrieve data from a backend over a public API that can’t be changed to fit the needs of your UI. In fact, it’s not a good idea that the backend provides an API depending on your UI because if you change your UI you may also have to change the backend. Therefore you have to transform the model into something your GUI can display easily. A typically example is to load a list of Items, let’s say a List of Users, from a REST json API and display them in a ListView. In a perfect world with MVP this works like this:

Nothing new here. List<User> gets loaded and the GUI displays the Users in a ListView by using UserAdapter. I’m pretty sure that you have used ListView and Adapter million times before, but have you ever thought about the idea behind Adapter? Adapter makes your model displayable through android UI widgets. This is the adapter design pattern, hence the name. What if we want to support phones and tablets but both display items in a different way? We implement two adapters: PhoneUserAdapter and TabletUserAdapter and we pick the right one at runtime.
That is the “perfect world” scenario. What if we have to sort the user list or display some things that has to be calculated in a more complex (and CPU intensive) way? We can’t do that in the UserAdapter because you will notice scroll performance issues because the hard work is done on the main UI thread. Therefore, we do that in a separated thread. There are two questions: The first is how do we transform the data? Do we take our User class and add some additional fields to User class? Do we override values of the User class?
public class User {
  String firstname;
  String lastname;
}
Let’s assume that our UserView wants to display the full name and calculates a ranking the list get sorted accordingly:
public class User {
  String firstname;
  String lastname;
  int ranking;

  public String getFullname(){
    return firstname +" "+lastname;
  }
}
While introducing a method getFullname() is ok adding a field ranking may cause problems, because we assume that User is retrieved from backend and has no ranking in it’s json representation. So first it may cause confusion if you look at your json api feed and compare that to our User class and last but not least ranking will be zero as default value because we haven’t computed the ranking yet. If we would have used an object instead of an integer then the default value would be null and it’s likely that we run into NullPointerException.
The solution is to introduce a Presentation Model. This model is just a class optimized for our GUI:
public class UserPresentationModel {
  String fullname;
  int ranking;

  public UserPresentationModel(String fullname, int ranking) { ... }
}
By doing so we are sure that ranking is always set to a concrete value and that fullname doesn’t get computed while scrolling the ListView (PresentationModel gets instantiated in separated thread). UserView now displays List<UserPresentationModel> instead of List<User>.
The second question is: Where to do that async transformation? View, Model or Presenter? It would be obvious that the View does that transformation because the View knows best how things get displayed on screen.
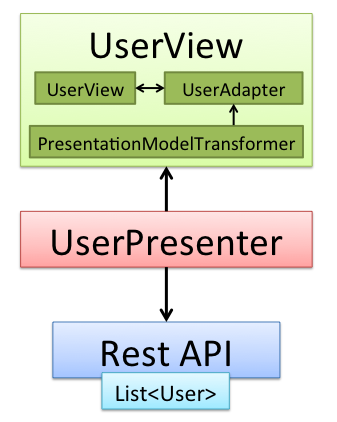
PresentationModelTransformer is the component that takes a List<User> and “transforms” that to List<UserPresentationModel> (adapter pattern, so we have two adapters: one to convert to presentation model and UserAdapter to display them in ListView). The advantage on integrating PresentationModelTransformer in the view is that the view knows how to display things and could easily internally change between phone and tablet optimized presentation models (maybe the tablet UI has other requirements then the phone UI). However, the big disadvantage is that now the view has to control the async thread and the view state (displaying ProgressBar while transformation is in progress?!?) which clearly is the job of the Presenter. Therefore, it’s not a good idea to let the transformation be part of the View. Including the transformation in the Presenter is the way to go:

As we have already discussed before, the Presenter is responsible to coordinate the View and therefore the Presenter tells the view to display the ListView after UserPresentationModel transformation is finished. Also the presenter has control of all async threads (transformation runs async) and cancels them if needed. By the way: With RxJava you can use operations like map() or flatMap() to do this transformation painless (regarding threading). If we want to support phones and tablets we could define two Presenters PhoneUserPresenter and TabletUserPresenter with different PresentationModelTransformer implementations. In Mosby the View creates the Presenter. Since the View knows at runtime if the View is a phone or tablet it can choose at runtime Presenter to instantiate (PhoneUserPresenter or TabletUserPresenter). Alternatively you could use a single UserPresenter for phone and tablet and just replace PresentationModelTransformer implementation i.e. by using dependency injection.
Tip 6: Navigation is a UI thing
In other MVP libraries or platforms like single page html sites (javascript) it’s the presenter who gets instantiated as first component and the Presenter creates the View. In that case it makes sense to navigate from Presenter to Presenter. However, this is not the case on Android (or at least not if you use Mosby) since the Android Framework defines Activity as entry point and Activity is seen as part of the View layer. So it doesn’t make sense to let the Presenter start the Intent for launching a new Activity.
Tip 7: onActivityResult() and MVP
There are situations where you have to use onActivityResult() for instance if you want to communicate with other apps like the camera app. Should you forward the result to the Presenter? It depends: If you just want to display the photo as it is in an ImageView then there is no need to forward that to the Presenter. Remember, the presenter is responsible to coordinate the state. So displaying just that Image in a ImageView most of the time doesn’t change the state and can be done directly.
 @Override
protected void onActivityResult(int requestCode, int resultCode, Intent data) {
    if (requestCode == REQUEST_IMAGE_CAPTURE && resultCode == RESULT_OK) {
        Bundle extras = data.getExtras();
        Bitmap imageBitmap = (Bitmap) extras.get("data");
        imageView.setImageBitmap(imageBitmap);
    }
}
If you have to do some additional image processing then you would do that async. In that case you should use the presenter and let the presenter control the view (like showing a loading view while processing image) like this:
@Override
protected void onActivityResult(int requestCode, int resultCode, Intent data) {
   if (requestCode == REQUEST_IMAGE_CAPTURE && resultCode == RESULT_OK) {
       Bundle extras = data.getExtras();
       Bitmap imageBitmap = (Bitmap) extras.get("data");
       presenter.makeThumbnail(imageBitmap);
   }
}
Tip 8: MVP and EventBus
An EventBus allows you to communicate between decoupled components by posting and receiving events. I assume that you are already familiar with the concept of an EventBus. EventBus is not MVP related but it fits to MVP like a hand in a glove. I came in touch with EventBus and MVP for the first time while developing something with GWT in late 2009 and it was mind blowing. From now on I always used MVP with EventBus, so I do on android. With RxJava some things done by an EventBus can be replaced with RxJava’s observer “push updates mechanism” (have a look at SqlBrite for a concrete use case). The difference between RxJava’s push mechanism and EventBus is that in RxJava you explicitly have to subscribe on an concrete observable whereas an EventBus is a little bit more loosely coupled since you just have to know the event you are listening for. So when I’m talking here about an EventBus you can think of every other push based update mechanism as well (like RxJava).
I see two use cases for EventBus:
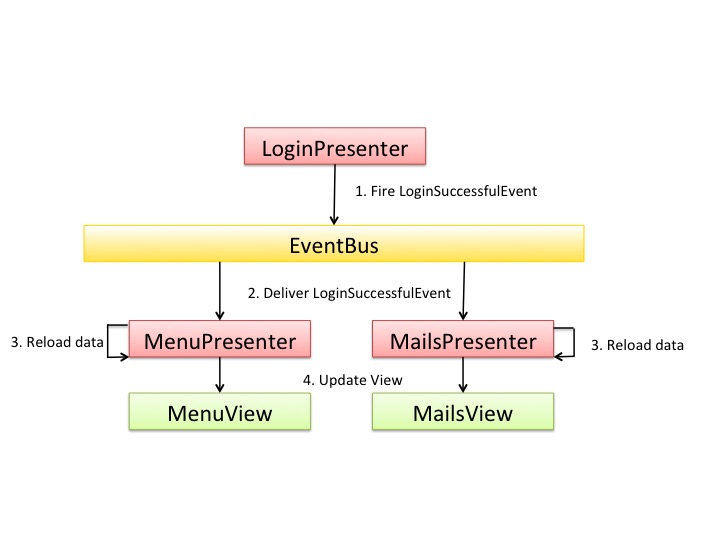
- EventBus for business logic events: The Events related to the business logic are posted to the EventBus. As we have discussed previously the View shouldn’t have any knowledge of the business logic. Therefore, the presenter is the component that listens for business logic events through the EventBus. In Mosby you should register and unregister the presenter from EventBus in attachView() and detachView() respectively. Why not registering in the constructor of the Presenter? Because if you have retaining Views (like retaining Fragment) the Presenter gets created only once, but the View can be attached and detached from the Presenter multiple times during orientation changes. In the mail sample I use EventBus quite a lot. The first thing you may have noticed in the video is that after the login was successful all views automatically begin to load data. You can see this even better if you start the mail app on a tablet.
That is not implemented by automatically do a refresh in Activity.onResume(). The LoginPresenter fires a LoginSuccessfulEvent to inform all other presenters that the user has been logged in successfully. The Presenters will then trigger a reload and update their Views.
- EventBus for UI Events: Another use case is to use the EventBus in your UI or to communicate between Fragments and Activities. The official docs recommandation to implement communication between fragments and the host activity is to define a listener interface and cast the Activity in fragments onAttach() method to the listener:
  @Override
  public void onAttach(Activity activity) {
      super.onAttach(activity);

      // This makes sure that the container activity has implemented
      // the callback interface. If not, it throws an exception
      try {
          mCallback = (OnHeadlineSelectedListener) activity;
      } catch (ClassCastException e) {
          throw new ClassCastException(activity.toString()
                  + " must implement OnHeadlineSelectedListener");
      }
  }
I don’t like that (casting an object to an interface). Every other java developer, i.e. in the J2EE world, would throw his hands up in horror if he sees something like this in his code. So why should it be the recommended way (btw. on iOS you are doing pretty the same)? I usually use an EventBus for doing that. The fragment fires an Event on the EventBus and the parent Activity is subscribed for that Event on the EventBus. The advantage of an EventBus is even bigger, if you have a split-pane layout displaying Fragment A on the left and Fragment B on the right. If Fragment A wants to communicate with Fragment B the docs recommend that Fragment A should talk to the parent Activity and then the Activity forwards the information to Fragment B. With an EventBus Fragment A can fire an Event and Fragment B, who is registered for that Event on the EventBus, gets notified immediately without having the Activity as middle man. In that way all 3 components (Activity, Fragment A and Fragment B) are decoupled (no one has a reference to each other).
A common use case where EventBus is useful is when implementing navigation drawer. If you click on a menu item the Activity should replace the current main fragment with a fragment associated with the clicked menu item. It turns out that Android itself already offers an EventBus you already use: Intents. Instead of using an external EventBus you could use Intent like I did in the mail sample. I set MainActivity to android:launchMode="singleTop” and check in onNewIntent() for the navigation events. The advantage with Intents is that this kind of Navigation can be used system wide (and not only app wide like EventBus). For instance when a new Mail is received a Notification will be shown in the StatusBar. Clicking on the Notification opens the Mail. There could be a Button in the Notification that opens the Inbox by clicking on it. Moreover, if you use an EventBus for navigation in your app then you might face the problem that you have to deal with Intents and with Events from EventBus to navigate in your app. You should think about that scenario and only use EventBus for navigation if your app can not run into this kind of problem.
Tip 9: Optimistic propagation
Let’s have a look at the mail app. When you star or unstar a Mail the star icon changes immediately. However, saving that a mail has changed takes two seconds and can fail. For a better user experience we assume that changing the stared mail will be successful. It gives the user of your app an immediately feedback and the feeling that your app works lightning fast.
At first glance you may think that this is too complex to implement for your simple app you are currently working on. It seems that you have to respect so many things for implementing that. Don’t worry, with a clean architecture like MVP and an EventBus it’s quite easy:
 public class BaseRxMailPresenter<V extends BaseMailView<M>, M>
     extends BaseRxAuthPresenter<V, M> {

   @Inject public BaseRxMailPresenter(MailProvider mailProvider, EventBus eventBus) {
     super(mailProvider, eventBus);
   }

   public void starMail(final Mail mail, final boolean star) {

     // optimistic propagation
     if (star) {
       eventBus.post(new MailStaredEvent(mail.getId()));
     } else {
       eventBus.post(new MailUnstaredEvent(mail.getId()));
     }

     mailProvider.starMail(mail.getId(), star)
         .subscribe(new Subscriber<Mail>() {
           @Override public void onCompleted() {
           }

           @Override public void onError(Throwable e) {
             // Oops, something went wrong, "undo"
             if (star) {
               eventBus.post(new MailUnstaredEvent(mail.getId()));
             } else {
               eventBus.post(new MailStaredEvent(mail.getId()));
             }

             if (isViewAttached()) {
               if (star) {
                 getView().showStaringFailed(mail);
               } else {
                 getView().showUnstaringFailed(mail);
               }
             }
           }

           @Override public void onNext(Mail mail) {
           }
         });

     // Note: that we don't cancel this operation in detachView().
     // We want to ensure that this operation finishes
   }

  ...

 }
If we star a Mail we fire MailStaredEvent and if we unstar a mail we fire a MailUnstaredEvent. As you seen in the video by staring a mail the left pane displaying the list of mails gets updated as well since the presenter is registered on those events. The trick is that we fire the corresponding event before we make the corresponding business logic call and we use the counterpart event to “undo” it in case that that the business logic call fails. Managing that logic in the Presenter is quite easy as you have seen in the code snipped above. But we also have to update the view. In MVP we have this clear separation between View and business logic, therefore the Presenter is responsible to update the view by calling the corresponding method defined in the view’s interface. As you see with a clean MVP architecture and EventBus doing such “complex” things is extremely easy. Presenter is doing the business logic staff and then the code in your View implementation is just a one-liner. However, if you would do that all in your Fragment (without MVP) then yes, it might be a little bit more complicated to maintain the correct state.
Please note that we are not canceling this business logic call in presenter.detachView() because we want to ensure that this call finishes. You may ask yourself now if that doesn’t result in memory leaks during orientation changes. The answer is “it depends on the definition of memory leak”. View gets detached from presenter during screen orientation changes. So the huge memory consuming view objects like Activity or Fragment don’t leak memory. However, the Presenter creates a new anonymous Subscriber object. Every anonymous object has a hard reference to the surrounding object. So yes, the Presenter can’t be garbage collected as long as Subscriber gets unsubsribed (business logic call has finished). But I wouldn’t call this a memory leak. It’s kind of a temporarily and wanted memory leak and from my point of view completely fine since presenter is a lightweight object and you know that the presenter can be garbage collected after the business call has finished.
Another sample where optimistic propagation improves the user experience of your app is when moving a mail from “Inbox” to “Spam”:
Tip 10: MVP scales
Most of the time you have one View (and Presenter) filling the whole screen. But that doesn’t has to be the case. Typically Fragments are a good candidate for splitting your screen into modular decoupled Views with his own Presenter. The sample mail client implements this as well when you open a profile by clicking on the senders image (avatar):
In that sample from the mail app shown in the video above the activity itself is a View having a ViewPager as content view. The Presenter loads a List of ProfileScreen. A ProfileScreen is just a POJO.
 public class ProfileScreen implements Parcelable {

  public static final int TYPE_MAILS = 0;
  public static final int TYPE_ABOUT = 1;

  int type;
  String name;

  private ProfileScreen() {
  }

  public ProfileScreen(int type, String name) {
    this.type = type;
    this.name = name;
  }

  public int getType() {
    return type;
  }

  public String getName() {
    return name;
  }
}
 public class ProfileScreensAdapter extends FragmentPagerAdapter {


  @Override public Fragment getItem(int position) {

    ProfileScreen screen = screens.get(position);
    if (screen.getType() == ProfileScreen.TYPE_MAILS) {
      return new ProfileMailsFragmentBuilder(person).build();
    }
    if (screen.getType() == ProfileScreen.TYPE_ABOUT) {
      return new AboutFragmentBuilder(person).build();
    }

    throw new RuntimeException("Unknown Profile Screen (no fragment associated with this type");
  }

  @Override public CharSequence getPageTitle(int position) {
    return screens.get(position).getName();
  }
}
Loading List of ProfileScreen takes 2 seconds (simulates loading the “screens displayed as tabs” for the ViewPager dynamically from a backend). So basically we have a LCE (Loading-Content-Error) and therfore we can use Mosby’s MvpLceViewStateActivity. Next every Fragment in the ViewPager is a MVP View and has it’s own presenter. I guess you get the overall picture: A MVP View can contain indipendent MVP Views.
Tip 11: Not every View needs MVP
This might be obvious but once you are in the ” I’m a super software architect “ mode you may forget that there are Views that just display static content. Static content does not need MVP.
Tip 12: Only display one Model per MVP view
Mosby assumes that every MVP view displays exactly one model (note that displaying a list of items is still displaying one model, the list). Why? Because dealing with different models in the same view increases complexity dramatically and we clearly want to avoid spaghetti code. In the sample app I faced that problem in the menu. I haven’t refactored that yet to give you the possibility to understand the problem with a concrete code sample. Have a look at the screenshot of the menu:
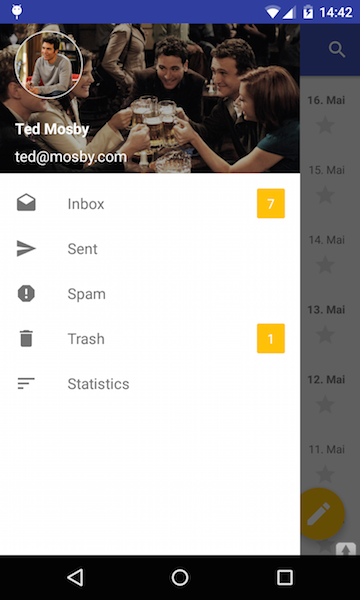
The header displays the current authenticated user, represented as Account, while the clickable menu items are a List<Label> (just ignore statistics). So we have two Models displayed in the same MVP View namely MenuFragment. The problem is that it makes your code more complex and harder to maintain if you work with two Models in the same View. Things get even more complex if you decide to use Mosby’s ViewState. Because, now you not only have to store the state showing labels, loading labels and error while loading labels, but you also have to store whether the user is authenticate or not.
The solution to this problem is to split the one big MVP View into two views with its own Presenter and own ViewState:
Tip 13: Android Services
Android Services are a fundamental part of android app development. Services are clearly “business logic”. Therefore it’s obvious that the Presenter is responsible to communicate with the Service. In the mail app I have used an IntentService to send mails. This SendMailService is connected over EventBus to the WritePresenter:
public class WritePresenter extends MvpBasePresenter<WriteView> {

  private EventBus eventBus;
  private IntentStarter intentStarter;

  public void writeMail(Context context, Mail mail) {
    getView().showLoading();
    intentStarter.sendMailViaService(context, mail);
  }

  public void onEventMainThread(MailSentErrorEvent errorEvent){
    if (isViewAttached()){
      getView().showError(errorEvent.getException());
    }
  }

  public void onEventMainThread(MailSentEvent event){
    if (isViewAttached()){
      getView().finishBecauseSuccessful();
    }
  }
}
Tip 14: Use LCE only if you have LCE Views
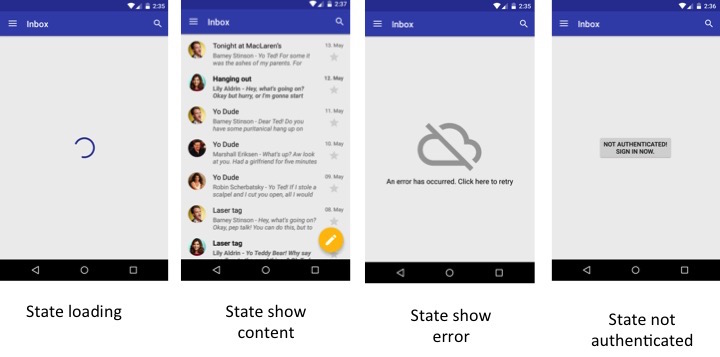
LCE stands for Loading-Content-Error. Mosby ships with MvpLceViewStateFragment implements MvpLceView which displays either the content (like a list of mails) or loading (like a progressbar) or an error view (like a TextView displaying an error message). This might be handy, because you don’t have to implement the switching of displaying content, displaying error, displaying loading by your own, but you shouldn’t use it as base class for everything. Only use it if your view can reach all three view states (showing loading, content and error). Have a look at the sign in view:
public interface LoginView extends MvpView {

  // Shows the login form
  public void showLoginForm();

  // Called if username / password is incorrect
  public void showError();

  // Shows a loading animation while checking auth credentials
  public void showLoading();

  // Called if sign in was successful. Finishes the activity. User is authenticated afterwards.
  public void loginSuccessful();
}
At first glance you might assume that LoginView is a MvpLceView with just having showContent() renamed to showLoginForm(). Have a closer look at MvpLceView definition:
public interface MvpLceView<M> extends MvpView {

  public void showLoading(boolean pullToRefresh);

  public void showContent();

  public void showError(Throwable e, boolean pullToRefresh);

  public void setData(M data);

  public void loadData(boolean pullToRefresh);
}
Methods like loadData() and setData() are not needed in LoginView nor make it sense to have pull-to-refresh support. You could simply implement that methods with an empty implementation. But that is a bad idea, because defining an interface is like making a contract with other software components: Your interface promises that the method is “callable” (in the sense of does something useful), but doing nothing on invoking this method is a violation of that contract. Also your code gets harder to understand and maintain if you have plenty of methods that get called from some other components but are doing nothing. Furthermore, if you use MvpLceView ususally you are going to use an already existing MvpLcePresenter implementation as base class for LoginPresenter. The problem is that MvpLcePresenter is “optimized” for MvpLceView. So you may have to implement some workarounds in your Presenter which extends from MvpLcePresenter to achieve what you want to do. Simply avoid that by not using LCE related classes if your view doesn’t have full LCE support.
Tip 15: Writing custom ViewStates
Mosby has a mechanism to save and restore the views state which is useful to handle orientation changes. Some ViewState implementations for MvpLceView are already provided by Mosby. However LoginView is not an MvpLceView (discussed in previous tip) and therefore needs its own view state implementation. Writing a custom view state is easy:
public class LoginViewState implements ViewState<LoginView> {

  final int STATE_SHOW_LOGIN_FORM = 0;
  final int STATE_SHOW_LOADING = 1;
  final int STATE_SHOW_ERROR = 2;

  int state = STATE_SHOW_LOGIN_FORM;

  public void setShowLoginForm() {
    state = STATE_SHOW_LOGIN_FORM;
  }

  public void setShowError() {
    state = STATE_SHOW_ERROR;
  }

  public void setShowLoading() {
    state = STATE_SHOW_LOADING;
  }

  /**
   * Is called from Mosby to apply the view state to the view.
   * We do that by calling the methods from the View interface (like the presenter does)
   */
  @Override public void apply(LoginView view, boolean retained) {

    switch (state) {
      case STATE_SHOW_LOADING:
        view.showLoading();
        break;

      case STATE_SHOW_ERROR:
        view.showError();
        break;

      case STATE_SHOW_LOGIN_FORM:
        view.showLoginForm();
        break;
    }
  }

}
We simply store the current view state internally as an integer state. The method apply() gets called from Mosby internally and this is the point where we restore the view state to the associated view. You may wonder how the ViewState is connected to your Fragment or Activity. MvpViewStateFragment has a method createViewState() called by Mosby internally, which you have to implement. You just have to return a LoginViewState instance. However, you have to set the LoginViewState’s’ internal state by hand. Typically you do that in the methods defined by LoginView interface as shown below:
public class LoginFragment extends MvpViewStateFragment<LoginView, LoginPresenter>
    implements LoginView {

  @Override public void showLoginForm() {

    // Set View state
    LoginViewState vs = (LoginViewState) viewState;
    vs.setShowLoginForm();

    errorView.setVisibility(View.GONE);

    ...
  }

  @Override public void showError() {

    // Set the view state
    LoginViewState vs = (LoginViewState) viewState;
    vs.setShowError();

    if (!isRestoringViewState()) {
      // Enable animations only if not restoring view state
      loginForm.clearAnimation();
      Animation shake = AnimationUtils.loadAnimation(getActivity(), R.anim.shake);
      loginForm.startAnimation(shake);
    }

    errorView.setVisibility(View.VISIBLE);

    ...
  }

  @Override public void showLoading() {

    // Set the view state
    LoginViewState vs = (LoginViewState) viewState;
    vs.setShowLoading();

    errorView.setVisibility(View.GONE);

    ...
  }
}
Sometimes you have to know if the method gets called from presenter or because of restoring view state, typically when working with animations. You can check that with isRestoringViewState() like showError() does (see above).
Tip 16: Testing custom ViewState
Since LoginView and LoginViewState are plain old java classes with no dependencies to the android framework, you can simply write plain old java unit test for LoginViewState:
@Test
public void testShowLoginForm(){

  final AtomicBoolean loginCalled = new AtomicBoolean(false);
  LoginView view = new LoginView() {

    @Override public void showLoginForm() {
      loginCalled.set(true);
    }

    @Override public void showError() {
      Assert.fail("showError() instead of showLoginForm()");
    }

    @Override public void showLoading() {
      Assert.fail("showLoading() instead of showLoginForm()");
    }

    @Override public void loginSuccessful() {
      Assert.fail("loginSuccessful() instead of showLoginForm()");
    }
  };

  LoginViewState viewState = new LoginViewState();
  viewState.setShowLoginForm();
  viewState.apply(view, false);
  Assert.assertTrue(loginCalled.get());

}
The idea is simple: We create a LoginViewState and set the internal state viewState.setShowLoginForm(). Next we create a mock view and call the apply() method on the view state. Then we check if the expected method has been called. You could also mock the LoginView with mocking libraries like Mockito, but I wanted to keep the sample simple and independent from other third party libraries.
To test if LoginFragment implements LoginView restores it’s state correctly during screen orientation changes it’s enough to test the ViewState because you can assume that Mosby’s internals are working correct.
So far we only have tested if restoring works correctly. We also have to test if we are setting the view state correctly. However, that is done in LoginFragment, so we have to test the Fragment rather than the LoginViewState. Thanks to Robolectric this is also straightforward:
@Test
public void testSettingState(){
  LoginFragment fragment = new LoginFragment();
  FragmentTestUtil.startFragment(fragment);
  fragment.showLoginForm();

  LoginViewState vs = (LoginViewState) fragment.getViewState();

  Assert.assertEquals(vs.state, vs.STATE_SHOW_LOGIN_FORM);
}
We simply call showLoginForm() and we check if the ViewState is STATE_SHOW_LOGIN_FORM after this call.
You could also test if LoginFragment handles screen orientation changes correctly by writing instrumentation test (i.e. with espresso), but the point is that in Mosby you have this clear separation between view and view state. Hence, you can test the view state independently, which usually requires less testing code to be written (compare the code above with an instrumentation test).
Tip 17: ViewState variants
Maybe it is still not clear what ViewState exactly is. Probably it’s easier to explain the ViewState concept with an example: For instance showing a loading view (ProgressBar) instead of the content view (ListView displaying items). That are clearly two different view states: the view should display either loading view or content view. But what if we add pull-to-refresh support to the content view (SwipeRefreshLayout around ListView). If the user triggers a pull-to-refresh action we show the ListView (content view) and a loading indicator at the same time. The question is: Which state is that? The view always is in exactly one state (that’s the definition of view state). So during pull-to-refresh the view’s state is not in “showing content” and “showing loading” at the same time. Internally the view is still in exactly one state. There are two possibilities:
- Introduce a new state for pull-to-refresh (displaying ListView and ProgressBar at the same time).
- Extending “show loading view state”: Additionally we store the information that a pull-to-refresh was triggered (i.e. a boolean flag) and that the ListView should be displayed as well. Using an existing ViewState and extending that one with additional info (i.e. a boolean flag for pull-to-refresh) is called a Variant of ViewState. We extend the “show loading view state” by adding the boolean pull-to-refresh flag which results in having two variants of the “show loading view state”. The first variant is where pull-to-refresh flag is true (view should display ListView and pull-to-refresh indicator) and the second variant is where pull-to-refresh flag is false (view should display a ProgressBar only).
It doesn’t make any difference which one of this two options you use, it’s just an internal implementation detail. The point with ViewState is that there is exactly one view state the view is in. However, one view state can have few variants. Having variants may require multiple information to be stored and multiple view methods to be invoked to restore this view state variant. Mosby’s default MvpLceViewState implementation uses approach number 2 which looks like this:
 private boolean pullToRefresh;

 @Override
 public void apply(V view, boolean retained) {
   if (currentViewState == STATE_SHOW_LOADING) {

    if (pullToRefresh) {
      view.setData(loadedData);
      view.showContent();
    }

    // view displays pull-to-refresh indicator if pullToRefresh == true,
    // otherwise hides content view or error view and displays big ProgressBar instead
    view.showLoading(pullToRefresh);
  }

  ...
}
However, I recommend to not having more than two variants of a ViewState and only prefer variants over defining a new view state if a variant is simple and doesn’t require complex restoring (in apply()).
Alright, now you should have an idea what the difference between a view state (i.e. show loading) and a view state variant (i.e. show loading with pull-to-refresh) is.
Let’s have a look at the mail sample app. Here we can find some custom view states that extend from already existing ones. AuthParcelableDataViewState for instance is an extension of LceViewState and has four states:
Adding an additional state is quite easy. Internally LceViewstate (from which AuthParcelableDataViewState inherits) has a field int state that is used for saving the current state. We simply reuse that field to add a new state for the case the user is not authenticated as shown below:
public class AuthParcelableDataViewState<D extends Parcelable, V extends AuthView<D>>
    extends ParcelableDataLceViewState<D, V> implements AuthViewState<D, V> {

  public static final int SHOWING_AUTHENTICATION_REQUIRED = 2;

  @Override public void apply(V view, boolean retained) {

    if (currentViewState == SHOWING_AUTHENTICATION_REQUIRED) {
      view.showAuthenticationRequired();
    } else {
      // call super to handle the states showing loading or error or content
      super.apply(view, retained);
    }
  }

  @Override public void setShowingAuthenticationRequired() {
    currentViewState = SHOWING_AUTHENTICATION_REQUIRED;

    // Delete any previous stored data of other view states
    loadedData = null;
    exception = null;
  }
}
The code should be self explaining. An example of how to implement ViewState with Variants can be found in SearchFragment implements SerachView, where I have implemented pagination (displaying a list of mails by loading the whole list in chunks, i.e. display 20 mails and if the user has scrolled to the end of the list then load the next 20 mails). Basically SearchView displays a list of mails, loading and displaying an error view. Therefore we can use a LCE based view state implementation. The question is which ViewState to use to add a Variant to it: “show loading” or “show content”? In that case it depends a little bit on your implementation. What I did to display “loading more” is I added an additional ViewType to SearchResultAdapter which displays the list of mails matching the search criteria in a RecyclerView (content view). So the last item the RecyclerView displays is a row displaying a ProgressBar. Since triggering a “load more action” requires to scroll the content view (RecyclerView) it feels more natural to me to add the view state variant to “showing content” instead of “showing loading”. Also is the “load more indicator” part of the RecyclerViews (content view) adapter. To implement a Variant of “showing content” we simply add a boolean flag loadingMore as you can see in SearchViewState:
// AuthCastedArrayListViewState is a LCE ViewState with an additional "not authenticated" state
public class SearchViewState extends AuthCastedArrayListViewState<List<Mail>, SearchView> {

  boolean loadingMore = false;

  public void setLoadingMore(boolean loadingMore) {
    this.loadingMore = loadingMore;
  }


  @Override public void apply(SearchView view, boolean retained) {

    super.apply(view, retained);

    if (currentViewState == STATE_SHOW_CONTENT) {
      view.showLoadMore(loadingMore);
    }

  }
}
If you don’t feel comfortable with ViewState Variants then simply don’t use Variants. Rather define new ViewStates instead. Defining new view states is cleaner, however may requires to write a little bit more code. As I’m a lazy guy I wanted to point out that variants can be used too. However, Variants are not a solution for everything and for everybody.
Tip 18: Not every UI representation is a ViewState
What if you open the inbox which is empty. Then the sample mail app desplays that:

Is that another view state? No, it’s just the view state “showing Content” with an empty List as data. In MailsFragment an empty list gets displayed like that. The UI is allowed to represent the same view state in different ways.
Tip 19: Not every View needs a ViewState
I’m sure that you find Mosby’s concept of ViewState as one of the most comfortable features Mosby offers. Handling orientation changes works like a charm out of the box. However, that comes with a price you have to pay. The ViewState is stored into the Bundle used in onSaveInstanceState(). This bundle is limited in size to about 1 MB. If your View displays a huge list of items then you might run over the limit of 1 MB since the list of items is stored in the Bundle as well (as part of ViewState). If you use retaining Fragment you don’t run into this kind of problem because the view state is stored in memory and not in the Bundle. Another thing you have to keep in mind is that an Activity can be destroyed by the Android OS and recreated if you navigate back to the Activity. When coming back the ViewState gets restored and the Activity may display old, stale data, because the same data has been edited in another Activity of your app in the meantime. Usually this doesn’t happen very often. However, if you display sensitive data you should keep that in mind and in that case it may be better not to use ViewState.
Tip 20: Avoid Fragments on the backstack and child fragments
I’m sure all of you have heard about how bad Fragment’s lifecycle is and that it is hard to work with that kind of lifecycle. Unfortunately many arguments against Fragments are correct and the lifecycle of Fragments gets even more strange if you put Fragments on the backstack or use child Fragments (Fragments in Fragments). Mosby can deal with them though. But in general it’s a good idea to avoid problems from the very beginning if you know that there may be trouble. You know that putting Fragments on the backstack may cause problems, then simply avoid putting Fragments on the backstack. Same is valid for child Fragments.
Tip 21: Mosby supports MVP for ViewGroups
If you want to avoid Fragments in general you can do that. Mosby offers the same MVP scaffold as for Activities and Fragments for ViewGroups, inclusive ViewState support. The API is the same as for Activity and Fragment. Some default implementation are already available like MvpViewStateFrameLayout, MvpViewStateLinearLayout and MvpViewStateRelativeLayout. This ViewGroup implementation are also useful if you want to have subviews in a fragment (since you should avoid child fragment). The mail sample uses that when you want to reassign the label of a mail:
This “Button” for assigning a Label is a MvpViewStateLinearLayout. It animates the ProgressBar (loadingView) in and out while loading, uses a ListPopupWindow (contentView) to display the list of labels and uses a Toast to inform about errors. By the way: there is no LCE default implementation for ViewGroups (how would you implement that for LinearLayout?).
Tip 22: Mosby provides Delegates
You may be wondering how Mosby can provide the same API for all kind of Views (Activity, Fragment and ViewGroup) without having code clones (copy & paste the same code). The answer is delegation. Mosby uses delegation since the very beginning (version 1.0.0). However, this delegation classes were a little bit hidden and hard to understand that they actually are Delegates that can be used and are part of the public API, namely ViewStateSupport and ViewStateManager. To make it easier for developers to use them, this delegate classes has been renamed in Mosby 1.1.0. The methods of the delegates also has been renamed to match the Activities or Fragments lifecycle method names (inspired by the latest AppCompatDelegate from android support library) for better understanding which delegate method should be called from which Activity or Fragment lifecycle method:
- MvpDelegateCallback: Is an interface every MvpView in Mosby has to implement. Basically it just provides some MVP related methods like createPresenter() etc. This methods are internally called by ActivityMvpDelegate or FragmentMvpDelegate.
- ActivityMvpDelegate: It’s an interface. Usually you use ActivityMvpDelegateImpl which is the default implementation. All you have to do to bring Mosby MVP support to your custom Activity is to call the corresponding delegate method from Activities lifecycle method like onCreate(), onPause(), onDestroy() etc. and to implement MvpDelegateCallback:
 public abstract class MyActivity extends Activity implements MvpDelegateCallback<> {

   protected ActivityMvpDelegate mvpDelegate = new ActivityMvpDelegateImpl(this);

   @Override protected void onCreate(Bundle savedInstanceState) {
     super.onCreate(savedInstanceState);
     mvpDelegate.onCreate(savedInstanceState);
   }

   @Override protected void onDestroy() {
     super.onDestroy();
     mvpDelegate.onDestroy();
   }

   @Override protected void onSaveInstanceState(Bundle outState) {
     super.onSaveInstanceState(outState);
     mvpDelegate.onSaveInstanceState(outState);
   }

   ... // other lifecycle methods
 }
- FragmentMvpDelegate: Same as ActivityMvpDelegate but for Fragments. To bring Mosby MVP support to your custom Fragment all you have to do is the same as shown above for Activities: Create a FragmentMvpDelegate and call the methods from the corresponding Fragment lifecycle method. Your Fragment has to implement MvpDelegateCallback as well. Usually you use the default delegate implementation FragmentMvpDelegateImpl
- ViewGroupMvpDelegate: This delegate is used for ViewGroup like FrameLayout etc. to bring Mosby MVP support to your custom ViewGroup. The lifecycle methods are simpler compared to Fragments ones: onAttachedToWindow() and onDetachedFromWindow(). The default implementation is ViewGroupMvpDelegateImpl.
Alright so far we have covered how to bring Mosby MVP support to your custom Activity, Fragment or ViewGroup. For supporting ViewState you have to use the following delegates instead of the delegates discussed above (ViewState delegates already include functionality of MVP delegates):
- MvpViewStateDelegateCallback: This interface extends from MvpDelegateCallback and defines the method you have to implement like createViewState().
- ActivityMvpViewStateDelegateImpl: This delegate is an extension of ActivityMvpDelegateImpl and works exactly the same way as shown in the previous code snippet: you have to call the delegates method from the corresponding activity lifecycle method. Like shown above your custom activity has to implement MvpViewStateDelegateCallback and use a ActivityMvpViewStateDelegateImpl instead of the non ViewState related ones:
 public abstract class MyViewStateActivity extends Activity implements MvpViewStateDelegateCallback<> {

   protected ActivityMvpDelegate mvpDelegate = new ActivityMvpViewStateDelegateImpl(this);

   // The rest is still the same as shown above without ViewState support

   @Override protected void onCreate(Bundle savedInstanceState) {
     super.onCreate(savedInstanceState);
     mvpDelegate.onCreate(savedInstanceState);
   }

   @Override protected void onDestroy() {
     super.onDestroy();
     mvpDelegate.onDestroy();
   }

   @Override protected void onSaveInstanceState(Bundle outState) {
     super.onSaveInstanceState(outState);
     mvpDelegate.onSaveInstanceState(outState);
   }

   ... // other lifecycle methods
 }
- FragmentMvpViewStateDelegateImpl: Extension from FragmentMvpDelegateImpl to add ViewState support.
- ViewGroupMvpViewStateDelegateImpl: The delegate for ViewGroups like FrameLayout to add ViewState support.
The advantage of delegation is that you can add Mosby MVP and ViewState support to any other Activity, Fragment or ViewGroup not included in the Mosby library like DialogFragment. In the main menu of the mail example you see the “statistics” menu item. If you click on it a DialogFragment get’s displayed. This is implemented like this:
public class StatisticsDialog extends DialogFragment
    implements StatisticsView, MvpViewStateDelegateCallback<StatisticsView, StatisticsPresenter> {

  @InjectView(R.id.contentView) RecyclerView contentView;
  @InjectView(R.id.loadingView) View loadingView;
  @InjectView(R.id.errorView) TextView errorView;
  @InjectView(R.id.authView) View authView;

  StatisticsPresenter presenter;
  ViewState<StatisticsView> viewState;
  MailStatistics data;
  StatisticsAdapter adapter;

  // Delegate
  private FragmentMvpDelegate<StatisticsView, StatisticsPresenter> delegate =
      new FragmentMvpViewStateDelegateImpl<>(this);


  @Override public void onCreate(Bundle savedInstanceState) {
    super.onCreate(savedInstanceState);
    delegate.onCreate(savedInstanceState);
  }

  @Override public void onDestroy() {
    super.onDestroy();
    delegate.onDestroy();
  }

  @Override public void onPause() {
    super.onPause();
    delegate.onPause();
  }

  @Override public void onResume() {
    super.onResume();
    delegate.onResume();
  }

  @Nullable @Override public View onCreateView(LayoutInflater inflater, ViewGroup container,
      Bundle savedInstanceState) {
    return inflater.inflate(R.layout.fragment_statistics, container, false);
  }

  @Override public void onViewCreated(View view, @Nullable Bundle savedInstanceState) {
    super.onViewCreated(view, savedInstanceState);
    delegate.onViewCreated(view, savedInstanceState);

    ButterKnife.inject(this, view);
    adapter = new StatisticsAdapter(getActivity());
    contentView.setAdapter(adapter);
    contentView.setLayoutManager(new LinearLayoutManager(getActivity()));
  }

  @Override public void onStart() {
    super.onStart();
    delegate.onStart();
  }

  @Override public void onStop() {
    super.onStop();
    delegate.onStop();
  }

  @Override public void onAttach(Activity activity) {
    super.onAttach(activity);
    delegate.onAttach(activity);
  }

  @Override public void onDetach() {
    super.onDetach();
    delegate.onDetach();
  }

  @Override public void onActivityCreated(Bundle savedInstanceState) {
    super.onActivityCreated(savedInstanceState);
    delegate.onActivityCreated(savedInstanceState);
  }

  @Override public void onSaveInstanceState(Bundle outState) {
    super.onSaveInstanceState(outState);
    delegate.onSaveInstanceState(outState);
  }

  ...

}
Delegation allows you to add functionality to any class inclusive third party frameworks like RoboGuice. Mosby’s ships with support Fragment (Fragments from support library). With delegation as described above you can use “native” android.app.Fragment as well.
Another advantage of delegation is that you can change Mosby’s default behavior by implementing a custom Delegate. For example: Mosby’s default implementation of how to handle Presenter during orientation changes is to recreate the presenter and to restart the requests (excepted retaining Fragments where the Presenter survives). You could write another ActivityMvpDelegate or FragmentMvpDelegate that internally uses a HashMap<Integer, MvpPresenter> to store an already existing Presenter and reuse it when the View gets recreated after orientation changes (instead of creating a new one and restart requests):
public interface IdBasedMvpView extends MvpView {
  public void setId(int id);
  public int getId();
}
public class IdBasedActivityMvpDelegate<V extends IdBasedMvpView, P extends MvpPresenter<V>>
    implements ActivityMvpDelegate {

  // Every view gets an unique id
  private static int lastViewId = 0;

  // Map to store presenter
  private static Map<Integer, MvpPresenter> presenterMap = new HashMap<>();

  // The reference to the Activity
  private MvpDelegateCallback<V, P>  delegateCallback;


  public ActivityMvpDelegateImpl(MvpDelegateCallback<V, P> delegateCallback) {
    this.delegateCallback = delegateCallback;
  }


  // Called from Activity.onCreate()
  @Override
  public void onCreate(Bundle bundle) {

    // Returns 0 if no view id is assigned
    int viewId = bundle.getInt("MvpViewId");

    MvpPresenter presenter = presenterMap.get(viewId);

    if (presenter == null){
      // No presenter in Map --> View starting first time
      // so create a new presenter and put it into presenterMap
      presenter = delegateCallback.createPresenter();

      viewId = ++lastViewId;
      presenterMap.put(viewId, presenter);
    }

    V view = delegateCallback.getMvpView();

    view.setViewId(viewId);
    view.setPresenter(presenter);
    presenter.attachView(view);
  }

  @Override
  public void onSaveInstanceState(Bundle outState) {
    int viewId = delegateCallback.getMvpView().getViewId();
    outState.putInt("MvpViewId", viewId);
  }

  @Override
  public void onDestroy() {
    delegateCallback.getPresenter().detachView(true); // true == presenter retains instance state
  }
}
public MyActivity extends MvpActivity implements IdBasedMvpView {

  ActivityMvpDelegate mvpDelegate;

  @Override
  protected ActivityMvpDelegate<V, P> getMvpDelegate() {
    if (mvpDelegate == null) {
      mvpDelegate = new IdBasedActivityMvpDelegate(this);
    }

    return mvpDelegate;
  }
}
We assign each view a unique id. With this id we can find the presenter in presenterMap. If no presenter is available, then we create a new one and put it into the presenterMap. The view’s unique id is stored into the views bundle. That way you would be able to have retaining presenters for Activities and non retaining Fragments as well. So why this is not the default implementation of Mosby? The problem with that approach is memory management. When does a Presenter gets removed from this map? If Presenter never gets removed does it cause memory leaks? Usually presenters are lightweight objects but most of the time they are a callback for an async running thread. To avoid memory leaks this is not the default strategy in Mosby. You could also implement an ActivityMvpDelegate that stores the Presenters state in a Bundle (like Mortar does, in combination with dagger scopes). So you see: Mosby offers a flexible scaffold and a default implementation that match the most scenarios. However, Mosby is customizable for edge cases.
Tip 23: Tips are good - experience is better
Whenever Barney Stinson leaves MacLaren’s pub at midnight with a big smile on his face and a beautiful woman next to him he knows that he has not succeeded because of the playbook. Actually he succeeded because he has a lot of experience in talking to woman (and wears suits!). Of course some tips and advices are helpful but at the end everyone has to make his own experience (including failing). The same is true when writing apps: you learn while developing and with every app you have developed your experience level increase and your next app will benefit from your experience. In this sense: Happy hacking!
I want to thank Kirill Boyarshinov very much for helping me.
The source code of the sample mail app can be found on Github. If you have any question don’t hesitate to leave a comment below.